Define or edit the details of an IEP form
To begin using an IEP![]() Individualized Education Program form in a Special
Education workflow
Individualized Education Program form in a Special
Education workflow![]() a method of coordinating multi-step processes involving one or more users, the details of the
IEP need to be defined. Or if you need to make changes to the form, you
can edit it.
a method of coordinating multi-step processes involving one or more users, the details of the
IEP need to be defined. Or if you need to make changes to the form, you
can edit it.
You may need to edit or create a new field on a form, which is used in Special Education workflows.
|
Note: You can also
modify and view IEP |
To define or edit the IEP form:
- Log on to the Special Education view.
- Click the Admin tab.
- Click the Forms side-tab. A list of existing special education forms appears.
- Do one of the following:
- To create a new IEP form: On the Options menu, click Add.
- To edit an existing IEP form: Select the checkbox next to the form you need to edit, and click Details on the Forms side-tab.
-
The Form Definition page appears:
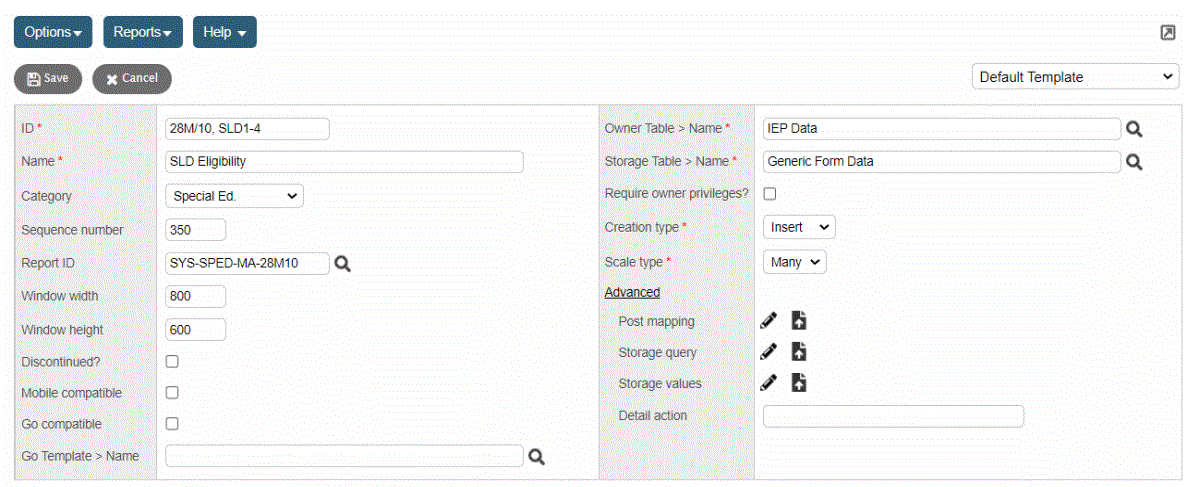
- Use the following table to enter or edit information in the fields:
-
Field
Description
ID
Type an ID.
Name
Type a name.
Category
Select the form category from the drop-down.
Sequence Number
Type the number that determines the order in which this form appears in the Forms Manager.
Report ID
Click
 to select
the associated report, if applicable.
to select
the associated report, if applicable.Window width/ Window height
Type the number of pixels to determine the size of the window in which the form appears.
Special Ed?
Select this checkbox if this is a special education form.
Select this checkbox if this is a professional development form.
Student?
Note: This field applies to templates that are not for special education use. Typically, if you select the Special Ed field above, you would not select this checkbox. Select this checkbox to make this form available from the Forms Manager in all views with the Student tab, Documents side-tab, Forms.
To have this form listed on the Forms Manager, the following two conditions must be met:
- Set this field to Y; and
- In the form’s details (Admin > Forms > Details), the Owner Table must be Student.
Discontinued?
Select this checkbox if this form is not currently in use.
Owner Table > Name
Click
to select
the table that provides the main subject for the form. For
example, for a Storage Table > Name
Click
to select
the table that provides the data storage for the form.Creation type
Select one of the following creation types, which determines if the records already exist in the storage table, or if the record is new each instance of the form:
- Insert (new)
- Update (pulls from existing)
Scale type
Select if a user can create One or Many forms in the Forms Manager.
Advanced
The Post mapping, Storage query
 a request to find a group of records that match specific criteria at a particular time,
and Storage values
fields let you use XML eXtensible Markup Language to
expand the capabilities of the form. Click
a request to find a group of records that match specific criteria at a particular time,
and Storage values
fields let you use XML eXtensible Markup Language to
expand the capabilities of the form. Click  to edit. Click
  to
upload a file.
to
upload a file.Note: Use the Post mapping feature to pre-populate the form from or post data to other tables in the database. For example, you can use this feature to pre-populate a staff credentials update form with a staff member’s existing credentials. The Detail action field is used by the Aspen Development team.
- Click Save.
|
Note: You can also
modify and view IEP forms and fields in the |